Berikut ini adalah skema motherboard merk ASUS


Berikut ini akan dibahas mengenai bagaimana cara merakit komputer, terutama bagi mereka yang baru belajar .. dari beberapa referensi yang saya pelajari .. maka berikut ini akan dijelaskan langkah demi langkah cara merakit komputer, mudah-mudahan bermanfaat .. Red. deden
Komponen perakit komputer tersedia di pasaran dengan beragam pilihan kualitas dan harga. Dengan merakit sendiri komputer, kita dapat menentukan jenis komponen, kemampuan serta fasilitas dari komputer sesuai kebutuhan.Tahapan dalam perakitan komputer terdiri dari:
A. Persiapan
B. Perakitan
C. Pengujian
D. Penanganan Masalah

Persiapan
Persiapan yang baik akan memudahkan dalam perakitan komputer serta menghindari permasalahan yang mungkin timbul.Hal yang terkait dalam persiapan meliputi:
Penentuan Konfigurasi Komputer
Konfigurasi komputer berkait dengan penentuan jenis komponen dan fitur dari komputer serta bagaimana seluruh komponen dapat bekerja sebagai sebuah sistem komputer sesuai keinginan kita.Penentuan komponen dimulai dari jenis prosessor, motherboard, lalu komponen lainnya. Faktor kesesuaian atau kompatibilitas dari komponen terhadap motherboard harus diperhatikan, karena setiap jenis motherboard mendukung jenis prosessor, modul memori, port dan I/O bus yang berbeda-beda.
Persiapan Komponen dan Perlengkapan
Komponen komputer beserta perlengkapan untuk perakitan dipersiapkan untuk perakitan dipersiapkan lebih dulu untuk memudahkan perakitan. Perlengkapan yang disiapkan terdiri dari:
Software sistem operasi, device driver dan program aplikasi.

Buku manual diperlukan sebagai rujukan untuk mengatahui diagram posisi dari elemen koneksi (konektor, port dan slot) dan elemen konfigurasi (jumper dan switch) beserta cara setting jumper dan switch yang sesuai untuk komputer yang dirakit.Diskette atau CD Software diperlukan untuk menginstall Sistem Operasi, device driver dari piranti, dan program aplikasi pada komputer yang selesai dirakit.
Pengamanan
Tindakan pengamanan diperlukan untuk menghindari masalah seperti kerusakan komponen oleh muatan listrik statis, jatuh, panas berlebihan atau tumpahan cairan.Pencegahan kerusakan karena listrik statis dengan cara:

Perakitan
Tahapan proses pada perakitan komputer terdiri dari:
1. Penyiapan motherboard
Periksa buku manual motherboard untuk mengetahui posisi jumper untuk pengaturan CPU speed, speed multiplier dan tegangan masukan ke motherboard. Atur seting jumper sesuai petunjuk, kesalahan mengatur jumper tegangan dapat merusak prosessor.

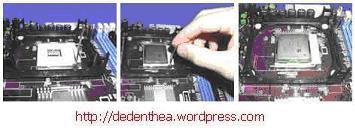
2. Memasang Prosessor
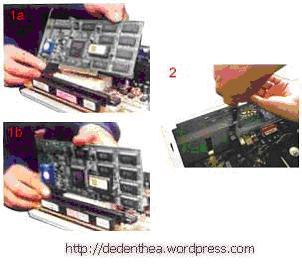
Prosessor lebih mudah dipasang sebelum motherboard menempati casing. Cara memasang prosessor jenis socket dan slot berbeda.Jenis socket
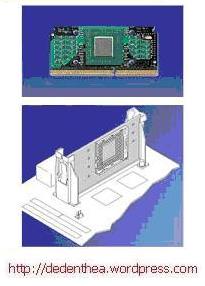
Jenis Slot
Selipkan card prosessor di antara kedua penahan dan tekan hingga tepat masuk ke lubang slot.
3. Memasang Heatsink
Fungsi heatsink adalah membuang panas yang dihasilkan oleh prosessor lewat konduksi panas dari prosessor ke heatsink.Untuk mengoptimalkan pemindahan panas maka heatsink harus dipasang rapat pada bagian atas prosessor dengan beberapa clip sebagai penahan sedangkan permukaan kontak pada heatsink dilapisi gen penghantar panas.Bila heatsink dilengkapi dengan fan maka konektor power pada fan dihubungkan ke konektor fan pada motherboard.

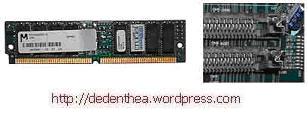
4. Memasang Modul Memori
Modul memori umumnya dipasang berurutan dari nomor socket terkecil. Urutan pemasangan dapat dilihat dari diagram motherboard.Setiap jenis modul memori yakni SIMM, DIMM dan RIMM dapat dibedakan dengan posisi lekukan pada sisi dan bawah pada modul.Cara memasang untuk tiap jenis modul memori sebagai berikut.
Jenis SIMM


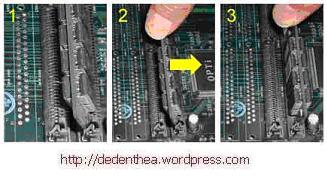
Jenis DIMM dan RIMM
Cara memasang modul DIMM dan RIMM sama dan hanya ada satu cara sehingga tidak akan terbalik karena ada dua lekukan sebagai panduan. Perbedaanya DIMM dan RIMM pada posisi lekukan
5. Memasang Motherboard pada Casing
Motherboard dipasang ke casing dengan sekerup dan dudukan (standoff). Cara pemasangannya sebagai berikut:

6. Memasang Power Supply
Beberapa jenis casing sudah dilengkapi power supply. Bila power supply belum disertakan maka cara pemasangannya sebagai berikut:

7. Memasang Kabel Motherboard dan Casing
Setelah motherboard terpasang di casing langkah selanjutnya adalah memasang kabel I/O pada motherboard dan panel dengan casing.


8. Memasang Drive
Prosedur memasang drive hardisk, floppy, CD ROM, CD-RW atau DVD adalah sama sebagai berikut:
Sambungkan kabel power dari catu daya ke masing-masing drive.

9. Memasang Card Adapter
Card adapter yang umum dipasang adalah video card, sound, network, modem dan SCSI adapter. Video card umumnya harus dipasang dan diinstall sebelum card adapter lainnya. Cara memasang adapter:
10. Penyelessaian Akhir

Pengujian
Komputer yang baru selesai dirakit dapat diuji dengan menjalankan program setup BIOS. Cara melakukan pengujian dengan program BIOS sebagai berikut:
Setelah keluar dari setup BIOS, komputer akan meload Sistem OPerasi dengan urutan pencarian sesuai seting boot sequence pada BIOS. Masukkan diskette atau CD Bootable yang berisi sistem operasi pada drive pencarian.
Penanganan Masalah
Permasalahan yang umum terjadi dalam perakitan komputer dan penanganannya antara lain:
LED dari hardisk, floppy atau CD menyala terus disebabkan kesalahan pemasangan kabel konektor atau ada pin yang belum pas terhubung. Selamat Mencoba dan Semoga Bermanfaat.

# Spesifikasi komputer yang disarankan untuk koneksi Internet pada Windows NT
* PC dengan prosesor Pentium 233 MHz
* Memori 128 MB
* Kapasitas Hardisk yang masih tersedia 200 MB
* Floppy Disk Drive 3,5-inchi
* CD-ROM atau DVD-ROM drive
* Sound card, Speaker atau headphone (tambahan)
* Keyboard dan Mouse
* Monitor SVGA
* Modem Internal/External 56.6-KBps
Spesifikasi minimal yang dibutuhkan buat instalasi ubuntu 8.10 dekstop adalah :
Mematikan Firewall
Firewall terkadang membuat kalian yang suka bermain game jadi tidak bisa terhubung ke internet --" Jadinya bagi kalian yang belum tau cara mematikan firewall kalian, post ini akan sangat berguna :p Firewall juga menurut saya memperlambat performa komputer kita, yang memang tidak begitu berguna kegunaannya. Sebenar nya cara mematikan firewall gampang sekali, ikutilah cara2 di bawah ini untuk mematikannya.
1. Klik Start Menu -> Settings -> Network Connections
2. Klik kanan pada Network Connections -> pilih Properties -> pilih tabs Advanced
3. Uncheck checklist pada Internet Connection Firewall
Setelah ini, firewall pada komputer kalian telah di non-aktifkan. Ada baiknya untuk menyalakan firewall, karena firewall dapat mencegah orang dari hacking ke komputer kita.
Untuk mengganti setting dari firewall nya, kalian tinggal beri checklist pada Internet Connection Firewall dan klik tombol Setting.
== MENGENAL BATCH PROGRAMING PADA WIND#ZE  ==

"aku tidak menyesali sedikitpun karena tidak bisa tahu banyak hal, tapi aku akan
 sangat-sangat menyesal jika tidak mengerti satu hal pun "
          [y3dips]

BEGIN

 *PENGANTAR:Tulisan ini dibuat untuk mengenalkan apa itu pemrograman batch file
,dan bagaimana membuat batch file tersebut.:) :P, bener kan kemarin saya ajak
belajar perl,sekarang " batch programing "..sadarilah. pemrograman itu indah!


Pemrograman Batch File adalah tak lain && tak bukan hanyalah batch[a] perintah
-perintah DOS ( Disk Operating system ), Dari  sinilah  dikenal dengan istilah
Batch tersebut. Hal ini yang menyebabkan  Pemrograman Batch ini menjadi sangat
tangguh   (untuk Wind#ze Offcourse) karena memberikan   kontrol  secara  penuh
terhadap DOS, [  padanannya pada *nix OPS.Syst adalah shell Programing ,red]

Perintah yang digunakan adalah semua perintah pada DOS OPS.SYS

adapun daftar perintah yang ada[diambil dari XP OPs]: untuk os win9xkemungkinan
besar tidak jauh berbeda,untuk  mengetahuinya  adalah  dengan  mengetikkan help
pada DOS prompt.

C:\DOCUME~1\Y3DIPS>help
For more information on a specific command, type HELP command-name
ASSOC    Displays or modifies file extension associations.
AT       Schedules commands and programs to run on a computer.
ATTRIB   Displays or changes file attributes.
BREAK    Sets or clears extended CTRL+C checking.
CACLS    Displays or modifies access control lists (ACLs) of files.
CALL     Calls one batch program from another.
CD       Displays the name of or changes the current directory.
CHCP     Displays or sets the active code page number.
CHDIR    Displays the name of or changes the current directory.
CHKDSK   Checks a disk and displays a status report.
CHKNTFS  Displays or modifies the checking of disk at boot time.
CLS      Clears the screen.
CMD      Starts a new instance of the Windows command interpreter.
COLOR    Sets the default console foreground and background colors.
COMP     Compares the contents of two files or sets of files.
COMPACT  Displays or alters the compression of files on NTFS partitions.
CONVERT  Converts FAT volumes to NTFS.  You cannot convert the
     current drive.
COPY     Copies one or more files to another location.
DATE     Displays or sets the date.
DEL      Deletes one or more files.
DIR      Displays a list of files and subdirectories in a directory.
DISKCOMP Compares the contents of two floppy disks.
DISKCOPY Copies the contents of one floppy disk to another.
DOSKEY   Edits command lines, recalls Windows commands, and creates macros.
ECHO     Displays messages, or turns command echoing on or off.
ENDLOCAL Ends localization of environment changes in a batch file.
ERASE    Deletes one or more files.
EXIT     Quits the CMD.EXE program (command interpreter).
FC       Compares two files or sets of files, and displays the differences
     between them.
FIND     Searches for a text string in a file or files.
FINDSTR  Searches for strings in files.
FOR      Runs a specified command for each file in a set of files.
FORMAT   Formats a disk for use with Windows.
FTYPE    Displays or modifies file types used in file extension associations
GOTO     Directs the Windows command interpreter to a labeled line in a
    batch program.
GRAFTABL Enables Windows to display an extended character set in graphics
    mode.
HELP     Provides Help information for Windows commands.
IF       Performs conditional processing in batch programs.
LABEL    Creates, changes, or deletes the volume label of a disk.
MD       Creates a directory.
MKDIR    Creates a directory.
MODE     Configures a system device.
MORE     Displays output one screen at a time.
MOVE     Moves one or more files from one directory to another directory.
PATH     Displays or sets a search path for executable files.
PAUSE    Suspends processing of a batch file and displays a message.
POPD     Restores the previous value of the current directory saved by PUSHD
PRINT    Prints a text file.
PROMPT   Changes the Windows command prompt.
PUSHD    Saves the current directory then changes it.
RD       Removes a directory.
RECOVER  Recovers readable information from a bad or defective disk.
REM      Records comments (remarks) in batch files or CONFIG.SYS.
REN      Renames a file or files.
RENAME   Renames a file or files.
REPLACE  Replaces files.
RMDIR    Removes a directory.
SET      Displays, sets, or removes Windows environment variables.
SETLOCAL Begins localization of environment changes in a batch file.
SHIFT    Shifts the position of replaceable parameters in batch files.
SORT     Sorts input.
START    Starts a separate window to run a specified program or command.
SUBST    Associates a path with a drive letter.
TIME     Displays or sets the system time.
TITLE    Sets the window title for a CMD.EXE session.
TREE     Graphically displays the directory structure of a drive or path.
TYPE     Displays the contents of a text file.
VER      Displays the Windows version.
VERIFY   Tells Windows whether to verify that your files are written
    correctly to a disk.
VOL      Displays a disk volume label and serial number.
XCOPY    Copies files and directory trees.

[penjelasannya sengaja tidak diartikan ke indonesia; repot :P]

untuk melihat lebih jelas per-sintax/perintah, ketik [perintah] /?
contoh:  C:\DOCUME~1\Y3DIPS>echo /?
maka akan tampil
Displays messages, or turns command-echoing on or off.

ECHO [ON | OFF]
ECHO [message]

Type ECHO without parameters to display the current echo setting.

silakan coba pelajari satu persatu :)


*PRA Programing

Coba  kita  ketik  di  konsole/command  promptnya  wind#ws  dengan  menggunakan
perintah/sintax ECHO
yang berfungsi untuk menampilkan pesan , sama seperti printf pada C && perl

sekarang kita akan menampilkan tulisan Hallo dunia :P

C:\DOCUME~1\Y3DIPS>echo hallo dunia
output yang dihasilkan adalah
hallo dunia

gunakanlah berbagai perintah/sintax yang bisa digunakan; silakan mencoba.

*Programing
Kalo tadi kita mengetikkan pada konsole/command prompt pada wind#ws dan sekarang
kita akan programing dengan menggunakan editor [biar keren dikit]
apa yang kita butuhkan ?
1. notepad
2. editor pada Dos promt [edit.exe, aku pake ginian biar gampang ,:p ]
3. editor kesayangan kalian ..

*simpan file dengan nama bebas berekstension BAT : ex [nama].BAT
selanjutnya untuk pembahasan kita gunakan edit.exe pada DOS biar mudah :)


*STARt PRograming
++penggunaan ECHO
sekarang kita lakukan seperti diatas, yaitu mencetak "HALLO DUNIA"

buka edit.exe dari command prompt
C:\DOCUME~1\Y3DIPS>edit
maka akan muncul suatu editor ,
ketik perintah  : ECHO hallo dunia
dan save dengan nama hallo.bat

jalankan dari command prompt
C:\DOCUME~1\Y3DIPS>hallo.bat
maka akan tampil output :
C:\DOCUME~1\Y3DIPS>echo hallo dunia
hallo dunia

hmm. terlihat perintah echo di tampilkan!, gak asyik deh, karena itu kita
tambahkan @ didepan perintahnya, @ECHO
C:\DOCUME~1\Y3DIPS>edit hallo.bat
tambahkan @ sehingga menjadi @echo hallo dunia
simpan dan eksekusi file hallo.bat, apa yang didapatkan
C:\DOCUME~1\Y3DIPS>hallo.bat
hallo dunia
:) lebih manis bukan? tanpa ada perintah echo yang terlihat, wah cape dunk
ngetikin "@" melulu didepan perintah echo,untuk itu gunakan @ECHO OFF yang
akan mematikan semua tampilan echo kelayar, sehingga sintax echo  tak akan
ikut ditampilkan,

kita coba :)
C:\DOCUME~1\Y3DIPS>edit hallo.bat
@echo off
echo hallo dunia
echo makan dulu ah
echo belajar terus
echo maen dunk!

save dan jalankan, maka akan menghasilkan output sebagai berikut


C:\DOCUME~1\Y3DIPS>hallo.bat
hallo dunia
makan dulu ah
belajar terus
maen dunk!

asyik bukan, hehehhehe :) :P

++penggunaan CLS
kita lihat helpnya
C:\DOCUME~1\Y3DIPS>CLS /?
hasilnya :

C:\DOCUME~1\Y3DIPS>cls /?
Clears the screen.

CLS

terlihat bahwa perintah CLs diguanakan untuk membersikan layar; seperti
perintah clrscr pada pascal, clear pada linux konsole dsb.

C:\DOCUME~1\Y3DIPS>edit hallo.bat
@echo off
CLS
echo hallo dunia
echo makan dulu ah
echo belajar terus
echo maen dunk!

Disimpan dan dijalankan > hasil yang didapat adalah hasil yang tampil dengan
layar yangtelah bersih a.k.a hanya hasil eksekusi yang ditampilkan :)

"semaKIN menarik ya? hmm.. "

++Penggunaan GOTO disertai Label sebagai tanda untuk lakukan looping

C:\DOCUME~1\Y3DIPS>edit loop.bat
(kita langsung gunaklan nama file sehingga langsung  terbentuk file loop.bat
ingat vi editor pada linux, seperti itu juga edit ini, red)

:satu
@ECHO HAHAHAHAHA
@GOTO satu

catatan: penggunaan label berbeda dengan bahasa pemrograman lain, contoh pada
pada C atau basic untuk label ditulis satu :
tetapi pada pemrograman batch ditulis :satu
perbedaan letak ":"


save dan jalankan, akan menghasilkan
HAHAHAHAHA
<<>edit tulisfile.bat
ketikkan
@echo hallo dunia > hallo.txt

save tulisfile.bat dan jalankan, apa yang akan dilakukan adalah menghasilkan
satu file txt yaitu "hallo.txt" yang berisikan tulisan hallo dunia :)
semakin sangat sangat menarik..

++Penggunaan IF untuk mengecek keberadaan file
mengecek file hallo.txt yang berada di folder yang sama dengan file program

C:\DOCUME~1\Y3DIPS>edit ada.bat
@IF EXIST hallo.txt ECHO filenya ada
save dan jalankan

C:\DOCUME~1\y3dips>ada.bat
filenya ada              <<>edit ada.bat
@IF EXIST hallo.txt ECHO filenya ada
@IF NOT EXIST hallo.txt ECHO filenya tidak ada
save dan jalankan,
maka akan menghasilkan statement "filenya tidak ada"

++Penggunaan REN atau Rename untuk merubah nama file

C:\DOCUME~1\Y3DIPS>edit gantinama.bat
@REN hallo.txt hello.txt

apa yang terjadi? "wow hallo.txt menjadi hello.txt

mo lebih sempurna tinggal kombinasikan dengan sintax lainnya


C:\DOCUME~1\Y3DIPS>edit gantinama.bat
@echo off
cls
if exist hallo.txt echo file ada
if not exist hallo.txt echo file gak ada
ren hallo.txt hello.txt
echo -----proses--------
if exist hello.txt echo penggantian berhasil

eksekusi : C:\DOCUME~1\y3dips>gantinama.bat

yang dihasilkan apabila file hallo.txt ada, adalah:

file ada
-----proses--------
penggantian berhasil

:) asyik bukan...


++Penggunaan ERASE :P
C:\DOCUME~1\Y3DIPS>edit hapus.bat
@ERASE hello.txt

hello.txt telah musnah.. hmmmm gimana ya? sepertinya mengasyikkan buanget!
jangan sungkan untuk bereksplorasi

++Penggunaan ... (isi sendiri)

[a]BAtch a.k.a [kelompok; jumlah ;rombongan] Kamus Umum Indonesia Inggris

EOF.
memang sih artikel ini gak ngebahas  semua, karena itu cobalah  semuanya,  lakukan,
dan jangan batasi imajinasi dan idemu  dengan   tembok  kemalasan :P cobalah  kamu
kombinasikan semua perintah, FORMAT? hmm.. jangan macam-macam deh :), kombinasikan
ERASE, ATTRIB ,pengaksesan dan pengeksekusian file dsb.. jadilah virus BAT...


"ILmu tetaplah ilmu, walau berbahaya dia tetaplah ilmu yang tak pernah  layak untuk
disembunyikan"
     [y3dips]

REFERENSI a.k.a bacaan:
helpnya WIND#ZE dan hasil coba coba file syntax*
Making Batch Files
A batch file is a normal text file, no programming involved. You type DOS commands into a text file, each one on a seperate line. Then, you give the text file a .bat extension instead of a .txt extension. Now, when you double click the batch file(In Windows Explorer) or type its name at the DOS prompt, it will execute the commands.
First, we need to know some DOS commands. If you're a regular DOS user, you can skip this section and go to CREATING A BATCH PROGRAM. The main DOS commands we will use are copy, move, del, cls, and echo. The COPY command has this syntax:
copy [source] [destination]
In DOS help, the syntax is more complicated, but we don't need the advanced features for our batch files. The COPY command, obviously copies a file. For example, say I wanted to copy a:\readme.txt to a:\windows\help.txt. (By the way, this will also rename the file.) I would type this:
copy a:\readme.txt a:\windows\help.txt
The MOVE command is exactly the same, except it MOVEs the file, and COPY copies the file.
The del command is very simple. It erases a file. It follows this syntax:
del [filename]
For example, if you wanted to delete a file called a:\happy.txt you would type this:
del a:\happy.txt
The CLS command clears the screen. This is the syntax:
cls
PAUSE is a command that stops the program and prompts you to "Press any key to continue." The syntax is:
pause
ECHO is a DOS command that shows the stuff you type. In a batch program, the @ symbol means not to echo a line. So, typing ECHO OFF prevents the user from watching the batch program execute. And, to keep from echoing the ECHO OFF command, type the @ symbol in front of it. Put it together and you get:
@echo off
All good batch programs start with the @ECHO OFF command followed by CLS. Important!: If you use the @ECHO OFF command in your batch program, be sure to put ECHO ON at the end of the batch program or the user will think their computer is messed up. The ECHO ON command is like this:
echo on
Now for the batch file! First, if you're using Windows, open a DOS prompt. To make a batch program to load a program called myname.bat, type this:
edit myname.bat
Then type:
@echo off
cls
echo Hi, my name is %1
pause
echo This is the contents of this batch file:
pause
type myname.bat
Then save it in a file called myname.bat. The "%1" allows you to add data to your batch file from the command line. Whatever you type after the batch filename at the dos prompt will replace the %1.
At DOS prompt, type
myname Suzanne
( you can use your name here) and your program will start!
When you have completed this lab, make sure that I see it so that I can grade you. This is lab 3B.
MSc CBIS
COMM57 Software Environments
Tutorial 2- Batch Files
Instead of printing steve every time you run the program, you could ask the user which word they wanted printed. To do this you need to make use of parameters (%1,%2..etc), in much the same way you did in the last tutorial.
echo off
REM ask user for what word to print
:start
echo %1
goto start
REM end of program
FOR...IN...DO
The format of the FOR command is
FOR variable IN (argumentlist) DO command
This is a repetition construct which will execute 'command' a number of times, depending on what's in the argument list. Suppose we have a list of names to process.
echo off
Rem command that prints out a list of names
FOR %%a IN (Andrew Bob Carol Daisy Ellen) DO echo %%a
echo off
FOR %%a IN (*.txt) DO echo %%a
Exercise
Can you amend the above program to make it print out a list of text files AND a list of executable files (.EXE)?
if /?
to get more information.
Exercise
Amend the above program so that the user can choose any file they specify, rather than using text.txt all of the time.
Exercise
Can you write a batch file that uses find to search for strings in all text files in a complete directory (use a small directory to test this), and then puts its results in a separate file, rather than displaying them on the screen?

 http://www.komisiGRATIS.com/?id=2010009638


 alt="itachi" border="0" />


